If you want to save major bucks and add instant equity to your bathroom renovation, build a tile shower! Skip installing the pre-fab showers at the improvement stores. Make a custom, luxe tile shower that fits your space!
I make it sound so easy. Well..... it's not complicated! You can do it! It's just time consuming.
For this post, I'm giving an overall run through of our project. *This is definitely NOT a step-by-step, full detail, how-to-complete a shower tutorial!* Ian learned and followed a few resources, but mostly retrieved information from www.floorelf.com. So if you are going to begin this type of remodel work, please reference that very educational website.
Here's our situation: we had a huge shower space in the Jack&Jill bathroom (think 4ft. wide by 9ft. tall), and it would have cost us double the price if we hired out this project! Therefore, it made sense financially to just build it ourselves! Plus, we're super picky. We're detailed driven. And when it comes to waterproofing, we are very particular and conscientious. Those HGTV remodeling shows have made me so paranoid about mold. So just call us the mold prevention specialist.
The old, teeny tiny shower was awkwardly placed right next to the bathtub.
The old toilet was placed in a huge corner of the room.
We took it out and swapped places with the old shower.
Now, the toilet is next to the tub and this is the location of our shower.
So onto the quick recap of what we've accomplished thus far...
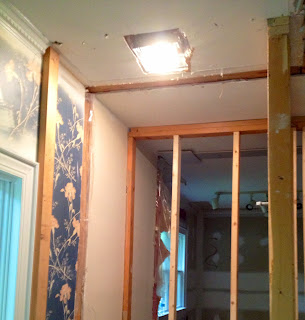
1. We demo'd the previous bathroom, re-locating the shower to a more practical corner. We hired a general contractor to change the plumbing and build the framework. The contractor also did a little electrical work, adding the vent/fan/light in the ceiling. *On a side note, I recently read that every bathroom needs a proper vent. You should leave that vent running for 30 minutes after you shower to prevent mold.*
So then the contractor left, and we were on our own... dun dun dun.
Demo and Relocation of the Shower
Shower Light and Vent Combo
What Scott Left for us to Finish
2. Ian researched and studied thoroughly before he started. (Click here for full instructions) This diagram (from www.floorelf.com) gave us a big picture perspective of all the layers/steps involved. For me, a visual learner, this helped tremendously.
3. After some self-educating, It was finally time to begin. Ian started by building the shower pan. You can buy pre-made shower pans and have them installed for an average cost of $400, or you can purchase the supplies and do it yourself for a tiny fraction of the price!
To make the shower pan, Ian covered the wood floor with plastic (the membrane) and then stapled metal lathe on top. *The plastic just helps the concrete cure. The metal lathe is needed so that the concrete (a deck mud bed mix) can adhere to something.*
Metal Lathe Covers the Plastic
Mixing the Mud
Building the Pre-Slope
Ian poured the pre-slope perfectly. Why is the pre-slope so important? The floor elf says, "Without a pre-slope your waterproof liner will lay flat on the floor. This does not give water anywhere to go. It will sit there, stagnate, mold, . . . you get the idea. With a proper pre-slope any water will drain to the weep holes in the drain and go where it needs to – away."
4. After building the pre-slope, Ian installed a waterproof liner. He bought this special liner (which meets plumbing code) at Home Depot. Measuring, cutting, and placing the liner was a bit tricky. Remember: be patient. He followed the elf's tips, and sure enough, it fit nicely. Oh, but just when he thought he was finished with this step, Ian also had to line and waterproof the curb! Oh what fun!
Properly Lining our Shower
Notice the black corner pieces on the curb? That's for sealing up cuts in the liner.
Ian says, "You're basically making a waterproof bowl."
Waterproofing the Curb
5. After lining the floor, Ian was able to cover the wall studs with 4mm plastic. This is the moisture barrier. Cement backer board then goes over the plastic. Also, Ian finished the floor by pouring the top mud bed. The top layer is an inch of concrete that sits directly on the waterproof liner. Since Ian did the pre-slope correctly, the top layer followed the angle to the drain evenly.
Waterproofing Both the Floor and Walls
Top Mud Bed. Shower Pan Complete!
6. Now it was time to prep the walls for tiling. Ian cut and hung heavy cement backer board (which is mold proof) on every inch of the wall and ceiling. Oh yeah, and he built a niche in the wall to hold soap and shampoo. The niche had to be waterproofed with red guard. Anyways, I helped him tape the seams on our walls with Alkaline Mesh Tape (for reinforcement). We then covered the mesh tape with thinset.
Now were are ready to begin tiling! The finished shower will be revealed in Part 2.
Seriously Heavy Cement Board!!!
Curb Mud Drying. Backer Board Seams are Drying too.
Alkaline Mesh Tape Covered with Thinset
Finally Looking Like a Shower! Tile to Come in 2014 :)


No comments:
Post a Comment